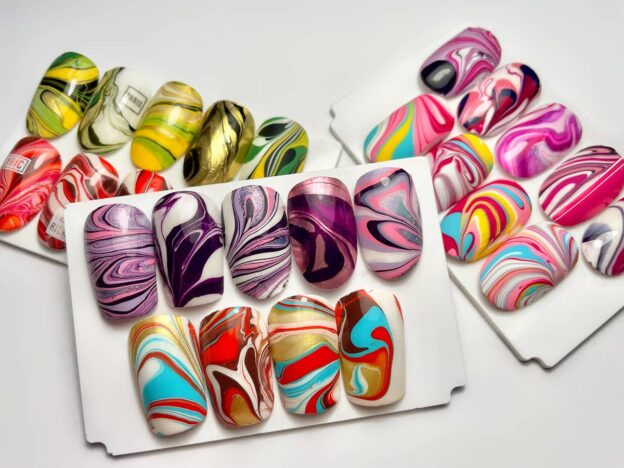
I still remember the first time I tried water marbling. I had watched dozens of videos showing perfect, swirling patterns emerging on the water’s surface. My first attempt? A muddy mess that looked nothing like the beautiful designs I had admired. But after some practice—and learning a few essential tricks—I finally cracked the code.
Water marbling is one of the most rewarding and eye-catching nail art techniques. Here’s everything you need to know to create your own mesmerizing swirls.
What Is Water Marbling?
Water marbling (also called water nail art or hydro dipping) is a technique where you drop nail polish onto the surface of water, swirl the colors into patterns, then dip your nail through the design to transfer it onto your nail. Each design is completely unique—no two nails will ever look exactly the same.
The science behind it is simple. Nail polish is oil-based and less dense than water, so it floats on the surface. When you swirl the colors together, they create beautiful, organic patterns that you can “capture” by dipping your nail through the design. The result is a one-of-a-kind, fluid artwork that looks like a marbled gemstone.
Why Water Marbling Is Worth Trying
The biggest advantage is that every design is completely unique. Unlike stamping or decals, where you can replicate the same pattern, water marbling gives you a different result every single time. There’s something special about wearing a design that literally no one else has.
It’s also surprisingly beginner-friendly. Yes, there’s a learning curve—your first few attempts might be messy. But once you understand the basics, the technique is remarkably simple. You don’t need a steady hand or artistic talent to create beautiful swirls.
Another advantage is the custom color palette. You control exactly which colors go into the design, so you can match your outfit, a seasonal theme, or your mood. The ability to choose and layer colors gives you endless creative freedom.
What You’ll Need
Room-temperature water. This is critical. Water that’s too cold won’t spread the polish properly; water that’s too hot will make it dry too quickly. Fill a small cup or bowl with filtered or bottled water at room temperature. Hard tap water can affect how the polish spreads—if you have hard water, use bottled water instead.
Nail polish. You can use regular polish, but some work better than others. Avoid fast-drying formulas—they dry on the water’s surface before you can swirl them. Sheer or jelly polishes are excellent for layering because they create depth. Stick to 2-3 colors per design for the most aesthetic result.
A toothpick or orange stick. For swirling the colors into patterns. You only need light touches—heavy stirring will create muddy results.
Base and top coat. A good base coat protects your nails, and a quick-dry top coat seals everything in.
Tape or liquid latex. To protect the skin around your nails. This is non-negotiable—the polish that floats on the water will stick to your skin if you don’t protect it.
Lint-free wipes and acetone. For cleanup between attempts and for cleaning the surface of the water.
Paper or cups. To hold your tools and keep your workspace organized.
How to Create Perfect Water Marble Nails
Step 1: Prep your nails. Start with clean, dry nails. Apply a base coat and let it dry completely. Then paint your nails with a white or light-colored base—this makes the marbled colors pop. Let the base coat dry thoroughly before the next step. Tape or apply liquid latex around each nail to protect your skin.
Step 2: Prepare your water. Fill a small cup with room-temperature water. The container should be deep enough to fully submerge your nail. Test the water with one drop of polish—it should spread into a circle. If it sinks, the water is too cold. If it spreads too fast, it’s too warm.
Step 3: Drop your polish. Hold your polish brush close to the water’s surface and drop one drop at a time. The first drop will spread into a circle. Drop your second color into the center of the first circle. The colors should float and form concentric circles. Add more drops if needed, alternating colors.
Step 4: Create the swirl. Using a toothpick or orange stick, gently drag through the circles from the center outward, creating swirls, zigzags, or other patterns. Work quickly but gently. Over-stirring will muddy the design. One or two passes is usually plenty.
Step 5: Dip your nail. Position your nail at a 45-degree angle over the design. Gently place it into the water, keeping it parallel to the surface. The design will wrap around your nail. Use a toothpick to clear away any excess polish on the water’s surface before lifting your nail out.
Step 6: Clean up and seal. Lift your nail out of the water slowly. Remove the tape or liquid latex. Use a small brush dipped in acetone to clean any remaining polish from your skin. Once the design is fully dry, apply a generous layer of top coat to seal and protect the pattern.
Pro Tips for Flawless Results
- Avoid fast-drying polishes. They dry on the water’s surface before you can swirl or dip.
- Use filtered water. Hard tap water can affect how the polish spreads.
- Drop colors one at a time. Don’t rush—each drop needs to spread fully before adding the next.
- Work quickly. Nail polish starts to dry the moment it hits the water. Have your nail ready and your design planned before you start.
- Clean the surface between dips. Any remaining polish on the water will stick to your next nail. Use a toothpick to clear it away.
- Test with one drop first. If it sinks, your water isn’t right. Adjust the temperature and try again.
- Practice on paper first. Before dipping your nails, practice on a piece of paper to get comfortable with the technique.
How to Maintain Your Water Marble Manicure
Water marbled nails are works of art, and they deserve the same care as any other manicure. Apply a high-quality top coat immediately after the design dries. For extra protection, apply a second layer of top coat after 24 hours. Reapply a thin layer of top coat every few days to refresh the shine and seal edges.
Wear gloves for dishwashing, cleaning, and gardening. Water and harsh chemicals are the fastest routes to chipping. Apply cuticle oil daily to keep the surrounding skin flexible and the manicure edges sealed.
The Bottom Line
Water marbling is one of the most creative and rewarding nail art techniques. It’s fun to experiment with, and no two designs are ever the same. With a little practice, you’ll create beautiful, swirling patterns that look like they came from a high-end salon. Don’t be discouraged if your first attempt isn’t perfect—each try teaches you something new, and the learning curve is part of the fun.

One thought on “The Art of Water Marble Nails: A Complete Guide to Mesmerizing Swirls”